Thursday, March 25, 2010

Everything's Coming Up Roses

A couple of weeks ago while reading Living With Lindsay, one of the blogs I follow, I was intrigued by an event that she was hosting.


The event, The $5 Challenge, is a challenge to shop for the supplies to make a spring decor item while spending less than $5 total for the item.  I like spring, I like home decor projects, heck, I even had five bucks. Always up for a challenge, I decided to give it a whirl. 

Well, naturally, when I think spring, I think flowers. When I think $5 or less, I think dollar stores.  When I think dollar stores, I think of my favorite, The Dollar Tree.  So off I went, with my $5 in hand to see what kind of trouble I could stir up.

I went up and down the aisles, pondering possibilities, picking stuff up, putting stuff back.  I started out with this little guy in my hand.


I then found this fun bag and thought okay, Easter theme.


I just wasn't feeling it.  Then I rounded a corner and inspiration struck me when I saw the most beautiful roses, blooming right there on the end of the Dollar Tree aisle. 

 I picked out my $5 worth of items and headed for the checkout.  Oh, the Easter bag and the little clown dude managed to come home with me too.  More about them later.

For the record, I love the shabby cottage look.  Shabby cottage with roses, even better! So, it came as no suprise that when I sat down to work on this challenge, I was having no trouble whatsoever getting into my project.  This time, I think the project may have also been getting into me.  Into my hair, under my nails, on my clothes... yeah, things were happenin' ...


But in the end, it was oh, so worth it!


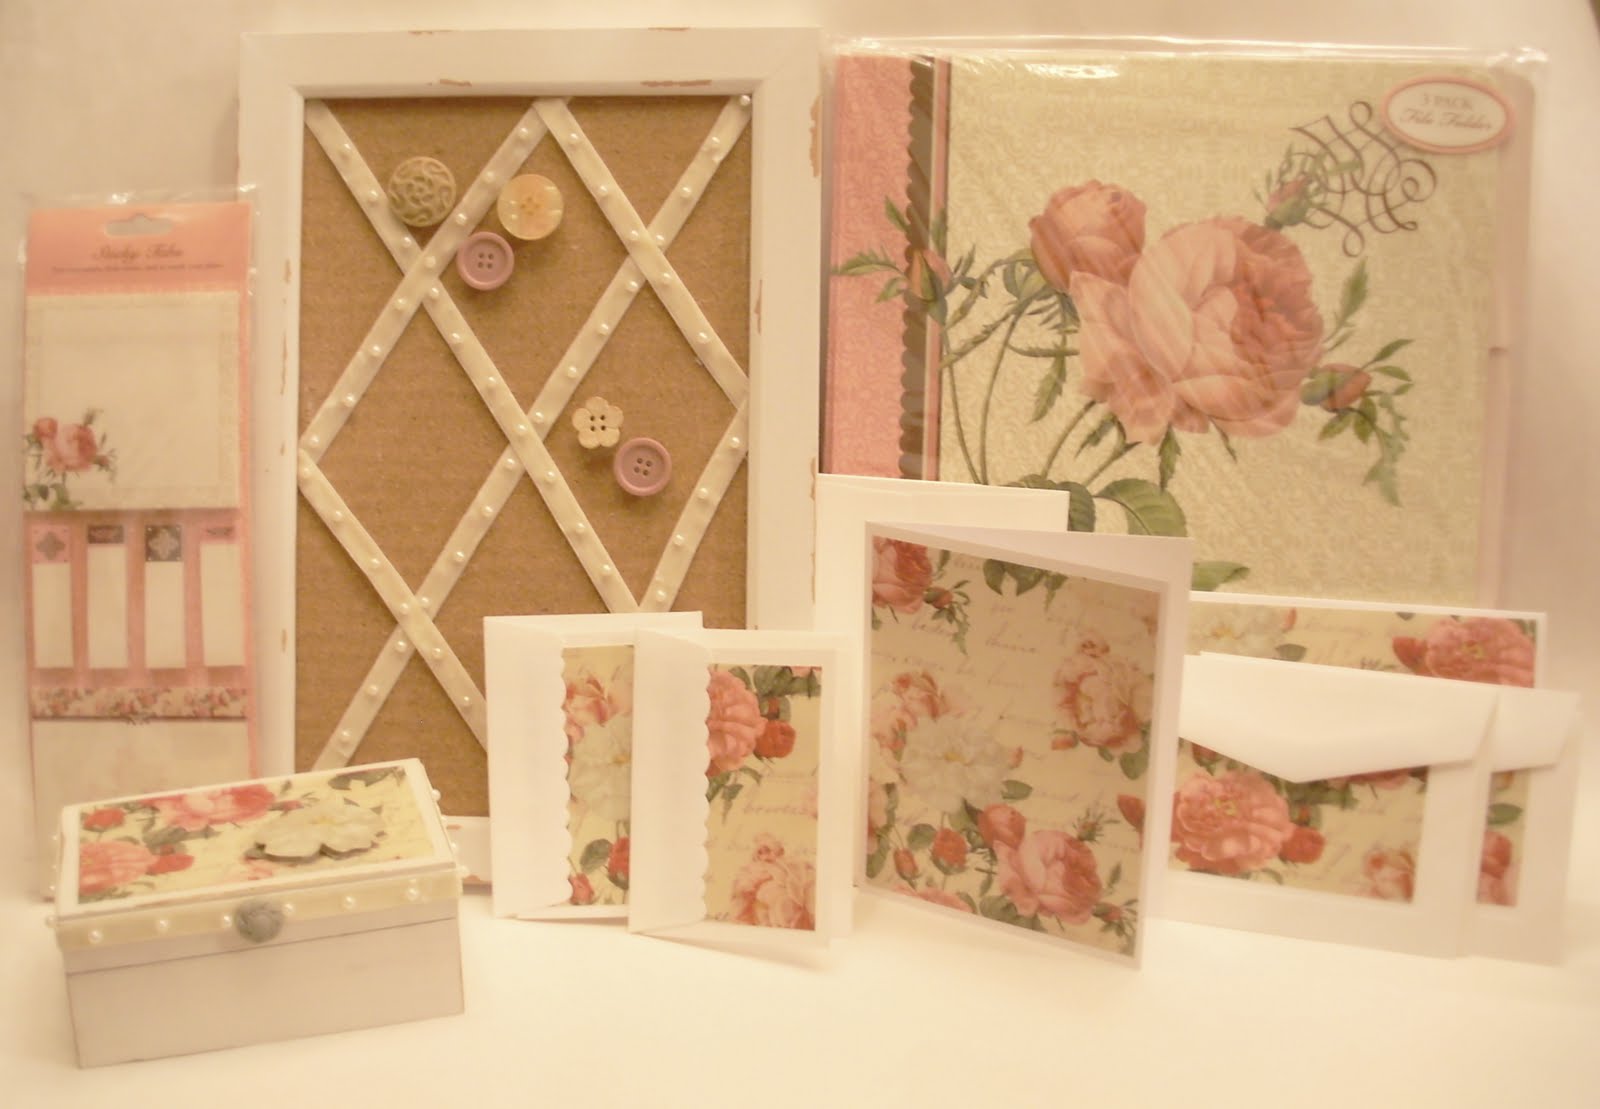
I ended up with a Shabby French Bulletin Board, a Trinket Box, and six notecards made from a gift bag and paper I had on hand. I  then paired them with the three file folders and a set of sticky notes I had purchased, that didn't end up being part of my projects, just matching accessories that make for one stinkin' cute shabby chic desk set, right?


But wait, there's more!
 (I always did want to be my own info-mercial)
Part of the challenge was to provide a tutorial on the projects that I did.  So... without further adieu, let's get our craft on!


I started out with paint.  Two coats of off white acrylic paint on the trinket box and the frame of the bulletin board.


The trinket box took a little longer to dry, so I set it aside and started on the bulletin board.  Using a small dot of glue in the corner, I started to glue down the beaded trim in a diamond pattern. 


Where the trim crosses itself, I added a small dot of glue to hold it in place. It wasn't rocket science, I just criss crossed the trim to make diamonds and cut it off where it reached the edge of the frame.  I noticed that the cork was flexible enough to lift it up a tad so I cut it a bit longer than needed and tucked the edge under the frame for a nice finished look.

Then, cause it ain't shabby unless it's chipped, I took my handy dandy nail file to the edges and chipped em' up good and shabby.


The end result:


So I set the board aside and tackled the trinket box.  I gave it the same treatment with the nail file on the edges of the box.

 I noticed that the wood was really light in comparison with the bulletin board and wanted to make the set match, so I went and got some wood stain that I had left over from another project.  Yeah, I never said I wasn't a messy crafter.  Don't judge.


 I dabbed some on the raw wood to darken it a bit. 


Let it set for about thirty seconds to soak up that Golden Oak goodness (???) 


Then I wiped it off with a paper towel.  Worked like I planned it that way. Next, I had to focus on the inside of the box.  I cut two pieces of the gift bag to fit inside the lid and bottom of the box.


Using Mod Podge, I glued them in place.


I wanted to make the box lid functional as well, so I added a piece of the trim to it and glued both ends in place but left the middle part unglued so that stamps or small mementos can be tucked in behind it. Neat huh?


Then I decided that it needed something extra.  Oh, who am I kidding?  One of the dang beads fell off and I had to think fast.  I raided my button stash and glued on a cool button to make it look like it was part of the plan all along.  Cause I am good at thinking under pressure and stuff. Uhem...


Next I started to work on the outside of the box.  First, I added another piece of the bag to the top of the lid.


I coated the lid with Mod Podge, set the paper in place, then did another layer of Mod Podge on top to seal it.  This helps make the outside stand up to handling and easy to dust. Not that I dust, but one could if one were so inclined...


It dries clear and to a matte finish.  Suddenly this tutorial is a lot like watching paint dry, right? Huh. While the Mod Podge was drying, I cut out three flowers from the bag and made these springy doo-dads.


You might be wondering what a springy doo-dad is for.  Or you might not.  Either way, I'm gonna tell ya.  Just hold yer horses and don't get ahead of me.  I took the first of the cut out flowers and glued it to the lid of the box.


Then, the other two get what I can only describe as the knuckle treatment.  I put the flower in my hand face down and rubbed it with my knuckle to round the paper. This gives them a curve and when you glue them onto the box they will pop up and be all nice and dimensional for you. Here is the process in pictures.


Okay, now for the springy doo-dad.  I bet the suspense was killing you, right?

I fan folded a strip of paper and added glue to one side of it.


Squish it back together so the folds get glued into a small block.


Yeah, it's messy, but what fun is crafting if you don't get messy? Notice the paint on my thumb.


This little springy doo-dad will give the flower added dimension and support as you build your flower pop up on the box.  And for those of you out there screaming "Doesn't she know about those foam dots?" First of all, stop screaming, it's rude. And second, yes, I know about them, but this was a $5 budget and I didn't want to add to my costs.  Geesh!


I added a bit more glue, squished the flower to the doo-dad, then glued the entire thing on top of the first flower which was now dried on the box lid.


I then cut out three random leaf shapes from the bag, gave them the knuckle treatment and added them to the lid by gluing them under the layers of flower petals.


Now for the big finish.  I laid out a line of glue all around the box and glued on more of the beaded trim to finish off the lid.  One problem, right smack dab in the front of the lid, the trim had a flaw in it.  Back to my button stash and presto change-o, another button saved the day.


Now what good would a bulletin board be without some cute little matching custom made push pins? That's what I thought too! Back to the button tin (thank you Grandma, your button tin is a treasure trove of vintage buttony goodness!) and a fun selection of buttons to work with. 


Flat backed ones work best, but I had one that had a loop on the back. 


 I used a pair of wire cutters to cut off the plastic loop and made it as flat as I could.


Then I applied a dot of glue onto each push pin and added the buttons.


These got added to the bulletin board for a fun, finished and totally coordinated look.


So then I set about cutting up the rest of the gift bag into pieces to layer onto cardstock to make cards to go with the desk set.  They are shown below with the finished items. 


So there you have it, my first $5 challenge.  All total I only spent $3.50 on the Dollar Tree items, as I had half the gift bag left over, so I am waaaaaay under budget here, folks.  That never happens!  Here's another peek at the entire desk set, all blinged out with her accessories. 


Not too shabby, huh?  Sorry, couldn't help myself.

I'll be linking up to some of my favorite parties through out the week:

Funky Junk Interior's Saturday Night Special
My Romantic Home's Show and Tell
Between Naps on the Porch for Metamorphosis Monday


So let me know what you think with some bloggy comment love. 

Til next time,
Lisa


Thursday, March 18, 2010

Mammogram + Retail Therapy = 50% off

I never was any good at Algebra, but bear with me, because I think I got this equation right.


Today I got to partake in the experience of my first mammogram. I am convinced that the whole process was invented by a man.  It had to be.  No woman would ever invent such a monstrocity of a machine with the intention of voluntarily sticking her own tender body parts in it only to smash them beyond recognition. He knew, I tell ya, he knew that as long as it was for body parts he didn't have, that it would never come back to haunt him. I now think that there should be a machine of equal torture for men and I intend to get started on inventing it as soon as this aching subsides and I can think straight once again. And, for the record, I don't think they will ever be the same. I am hoping that someday they will forgive me.  I am also swearing off pancakes for the time being.   

 So, as I was running and screaming walking out the door of the Women's Health Center, the sunshine was streaming down through the awning overhead and I suddenly realized how beautiful the day was turning out to be, even with the rather rough start I had just had.  I had no plans for the rest of the afternoon because, frankly I didn't know what to expect.  My thoughts going into this experience ranged from leaving the appointment whistling a tune to crawling on my hands and knees begging for someone to get me an icepack.  It was somewhere in between the two.  I didn't need an ice pack.  I needed therapy.  Retail therapy.

I headed for my car and after settling into the seat and very gently buckling into my seat belt, I headed for the best therapy I could think of: Value World!


I was driving along, enjoying the sunshine, listening to my favorite tunes and wondering what kind of goodies I was about to find at one of my favorite thrift stores.  I have a notebook that I keep in my tote bag which has a list of ongoing searches for specific items I am hunting for. Having just returned from Florida and doing some great thrifting there, I hadn't taken the time to update my list. So, I decided when I pulled into the parking lot that I would wing it and left my list in the car. That's living dangerously, no?

I walked in and the place was HOPPIN!  I have never seen so many people in the store at one time, so I knew something was up, but I didn't have a clue what was going on.

I wrestled for what felt like an eternity with the shopping cart from Hades. I managed to get it out of the cart corral with only a few odd looks from other customers. Okay, so I was a bit cranky, but if they only knew how my day had started, they might be more understanding.  Whatever. Deal with it people. On with the hunt.

When I shop at Value World, I usually head right for the back of the store and make a sharp right hand turn to the left, head all the way down the aisle and turn back around, perusing the items on what I call the "shelves of doom".  There are two stores I shop at that have these shelves, Value World, and a local Goodwill Store.  The shelves in both places are one in the same. Crammed as full as possible with the oddest of combinations of items you ever saw. Today was no exception.


I started my journey through the shelves of doom and quickly came upon my first find.


A few weeks ago, I was reading blogs and came across a fellow thrifty blogger that had fallen head over heals in love with a finial in the Pottery Barn catalog.  But like the rest of us, she hadn't fallen in love with the $19 and $39 price tags and she made the neatest version of her own finial.


Pottery Barn

I am sorry now that I don’t remember what blog it was that I saw it on, because she did a bang up job of it. Anyway, when I saw this item, it reminded me of the post and the fact that she had simply spray painted the items to make her own. I can spray paint.


For $2.02 I quickly added this little gem to my cart. And yes, if you crank your head upside down you will see that the tag in the picture does say the original price was $22.95. Score!


Moving along, I came upon my next item of interest. This pretty curtain rod holder. There was only one of them sitting on the shelf, but that was okay by me. I didn’t want it to hold up my curtains. I have plans to use it in my studio to hold lengths of ribbons and vintage lace. I have been looking at these for quite some time and finding them priced really high, like anywhere from $5-10, even at thrift stores. What, are they made of gold or something??? You don’t know how many of them I have passed by, like this one, last week in Cincinnati.


They wanted $10 for it and I just wasn’t going to pay that. Even though it would have matched my theme in my studio better, I am just too cheap.


So, when I saw this one for $3.63 I figured I had better jump on it. Not literally of course…

I kept finding little odds and ends here and there, looking them over and putting most of them back on the shelf. A few items did manage to make it off of the shelves of doom and into my cart. Two darling little saucers that I am pretty sure will go well with two darling little cups I found in Florida, or was it Cincinnati, I don’t remember. They were 30 cents and 40 cents. How could I go wrong?


Though I need another basket like I need another hole in my head, I always stop at the basket bin. It is like some kind of gravitational pull draws me to it. I dig and sort like a dog who has buried a bone and can’t remember where he put it. Usually I can get through clear to the bottom without finding anything I can’t live without, but this time I found these two matching wire planter holders.


I think with a little cleaning and some spray paint, they are going to look awfully cute on my patio steps this summer with some red geraniums in a terra cotta pot. Heck, I may not even paint them, as I kinda like their rusted chippy goodness. Maybe just a clear coat of poly to seal them. I bought them, cobwebs and all. They were 95 cents each.

Immediately following the basket bin is the pillow bin. It has the same weird gravity thing going on as the basket bin. I am sucked in I tell ya. I have never found a pillow at Value World that I couldn’t live without and really felt that it was a waste of my time to look there today. However, because I was already there specifically to waste time, why not just take a look-see? Boy was I ever glad I did!


Again, I am in the midst of redoing my studio and plans are to include a futon/daybed that I intend to line with pillows. I have found three pillows in my thrifting efforts so far, but when I stopped to look today, I was able to add two more to the collection. First, an adorable tiny embroidered pillow with a green ribbon attached to it. At first I thought it might just get lost in the pile of pillows, and I almost tossed it back in the bin, but after thinking about it, I decided it would make a darling door hanger like one that I saw a few weeks ago at JoAnn Fabrics. And for only  80 cents? Poof! Into the cart she went. She was quickly joined by this beauty.


Look at that gorgeous Battenberg Lace! The cover comes off for washing (I had already taken it off when I took this photo) and the insert is super soft and cushy. $2.20!

As I am digging I kept tossing this chair cushion from side to side. It kept coming back to the surface time and again and I was starting to get a bit irritated by the dang thing (remember my delicate condition was affecting my mood) when I finally stopped to look at it.


Hey, those colors would go perfect in my studio, and remember that chair you picked out of the neighbor’s trash heap last fall that you’ve been meaning to paint? What if? Poof! She joined her pillow pals in the bottom of my cart. I wasn’t committing to purchasing the cushion, but I do tend to throw things into the cart while I mull them over. You know, letting the idea of it all marinade in my head while I keep looking.

Did I just admit to the entire blog reading world that I picked a chair out of the neighbors trash heap??? I guess I did. And if this chair turns out half as cute as I have it pictured in my mind’s eye, you’ll be wishing your neighbors would throw out a totally cute chair too.

So I look up and the store is still just jam packed with people. What on earth has this place so busy today? Must be the good weather, people just wanted to be out and about. So I turn my cart to avoid the mass of people in the clothing aisles and wind up in the curtains and bedding aisle. I usually can make it through this area without stopping as I head toward the checkout counter. Today however, something here caught my eye too.


How is it that this fabric I see sticking out from the rack completely coordinates with the seat cushion I just tossed in the cart to think about? It had such a pretty vintage look to it. I pulled it out of the rack it was stuffed in to get a better look and find out that what I thought was sheets or bedding of some sort was actually two large lined curtain panels. Two large lined heavy linen curtain panels. Two large lined heavy linen curtain panels with a tag that read Laura Ashley, Made in Great Britain!!!


Laura Ashley is one of my favorite designers of all things shabby cottage style, the exact look I am going for in my studio. And the price, a mere $4.20 for the pair! Does it surprise you to know that I have two windows in my studio? Didn’t think so. They measure about a foot wider than my windows, so I will be cutting them down the center and making two sets of curtains out of them. They are gorgeous and soft and just the vintage look that my room needed. Grin!

I continued looking through all of the items in the aisle and discovered that along with the sheets and curtains, they had several fabric remnants. I found two pieces that were really nice that I immediately tossed in the cart as well.


A two yard piece of heavy decorator fabric with roses and flourishes in the design.


The other was a huge 6 yard piece of a woven cotton checked pale yellow, green and white. Both pieces were marked $1.80 each.  Check out all that fabric!


I then found what I think is a table runner in a blue checkered pattern. I don’t really need a table runner, but thought it might be nice to make a few pillows out of the fabric. For a mere $1.20 I couldn’t go wrong!

Okay, I am suddenly seeing that the theme of the day is most decidedly turning into shabby cottage studio day. I start making my way toward the checkout when again, something catches my attention. Out of the corner of my eye, on the top of the shelf where they have stacked just oodles of bunnies, baskets, eggs and other various Easter enticements, I see them.


Leaned up against a weird looking cross eyed bunny creature, I see this package of “Instant Stencils”. Now, I have never used anything like them, had no clue what they even were, but found myself reaching up to grab them for a closer look, just based on the colors and design alone.


I mean, why wouldn’t I? Look at them!
Now look at the chair cushion again.


and the curtain panels.


Is there any way that these were not destined to come home with me? Didn’t think so. 80 cents. I am thinking there is definitely a chair project in my not so distant future, how about you?


I finally make it to the checkout line. And boy do I mean line. I have never had to stand in such a long line at Value World. Weird. I am standing there, peering into my cart, doing my normal thing, editing. Trying to decide what I really want/need and what is probably just another project wanna-be that I will never end up completing. Thing is, I hadn’t added anything to the cart today that I didn’t really want. So as I am standing there, fumbling through my cart full of goodies, a voice from behind me, which was actually the lady in line ahead of me, says “Do you have a coupon?” Huh?

I turned to look at her and she asked me again, “Do you have a coupon? You know, for the sale?” I must have had a confused look on my face that said I didn’t have said coupon, because she immediately started fumbling through her purse and pulled out a sheet of paper with an online coupon printed on it. She handed it to me and when I looked down at it, I couldn’t believe what I saw!


Oh. My. Goodness! I had no idea that this sale was taking place! That explains the crowd! I had no idea Value World had a website! I also had no idea that there were 13 of them in the state of Michigan alone! I have been shopping at this store for at least 8 years and thought all along that it was a one of a kind thrift store. I got home today to find out on the website that they are in three states: Michigan, Indiana, and Ohio.

I thanked the sweet lady profusely and inside I was jumping for joy. Outside, there would be no jumping today, nothing even remotely close to jumping or jostling of any sort. Uhem.

As I unloaded my treasures onto the checkout counter, the clerk added up my total. What I thought was going to be a rather sizeable purchase turned out to be less than a $20 bill! I had even added a few items from the jewelry counter while standing in line (they get me every time on that one!)

On the drive home, I wished there was something that I could have done for the sweet lady that gave me the coupon to return her kindness, when it dawned on me. Pay it forward. So, for all of you who are lucky enough to be in my state or neighboring states, here’s the link to Value World’s website, where you can download your own coupon, good til the end of March. Print two. One for you, and one for the frazzled lady in line behind you who may or may not have had her bits squashed earlier that day. Enjoy!


Linking up to Southern Hospitality's Today's Thrifty Treasures and Nifty Thrifty Tuesday at Coastal Charm.

Til next time!
Lisa


Related Posts with Thumbnails